Remodeling Your Bathroom for Accessibility

A lot of people choose to remodel their bathrooms with accessibility in mind. They want to be prepared for an injury or a health crisis that may come their way, or they have elderly family members living with them who need an accessible bathroom. Click https://www.bathremodeljacksonvillefl.com/ to learn more.

bathroom remodeling

A few simple modifications can make the space safer and easier to use for anyone. These changes include:

A well-lit bathroom is important for people with limited mobility. Keeping fixtures like lights, mirrors, and sinks well-lit will help individuals with vision impairments to see what they’re doing. This can reduce the risk of falls, making a handicapped bathroom safer.

It’s also recommended to have ample light sources that can be easily accessed from a sitting position. Swapping out burnt-out light bulbs and adding new fixtures can brighten up the space and make it easier to see when performing tasks.

Another consideration for lighting in a handicapped bathroom is a system that provides options to control brightness. Using multiple switches to control different bathroom areas allows users to customize their experience and maintain independence. This is one of the ways the ADA guidelines for bathrooms promote the concept of universal design principles.

For instance, an ADA-approved wall sconce with a slim profile is ideal for narrow home spaces. Its slender wall extension limits the amount it protrudes from walls, allowing more room for wheelchairs and walkers. This can prevent bumping into or tangling with the fixture, which could injure a person with limited mobility.

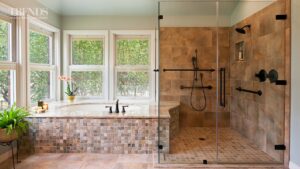
Grab bars can reduce the risk of falls by providing a strong, stable grip that helps individuals maintain their standing balance. They can also help individuals transfer to and from the toilet more easily, reducing strain on knees and backs. Additionally, they can add confidence and security to any bathroom design. For these reasons, ADA guidelines for grab bar placement play an important role in creating spaces that are safe and accessible for all users.

Straight grab bars are common and can be mounted horizontally or vertically on any wall surface. However, they are not the only type of grab bar available. There are also grab bars that are designed for specific situations, such as angled grab bars that work in showers or bathtub areas. There are also grab bars with a non-skid coating that can improve safety and comfort for anyone who uses them.

When mounting grab bars, the best method is to screw them into the wall framing for the most secure installation. However, many contractors fail to properly install the required blocking between studs, which can lead to improper grab bar placement that may not meet ADA guidelines and put both the contractor and property owner at risk of liability. When you partner with Improveit to remodel your bathroom, we take the walls down to the studs to ensure the proper blocking is added for accurate grab bar placement.

ADA guidelines specify that grab bars should be located near toilets in both the side and rear walls to support individuals while transferring into or out of the bathroom. In addition, they should be installed in showers and tubs to provide additional support during transfers and while standing up. When correctly placed, these supports can help prevent injuries and increase the independence of individuals with disabilities.

During a bathroom remodel for accessibility, it’s important to consider the design of countertops and vanity areas. While a standard countertop may work for someone who can stand, wheelchair users need a lower workspace. Luckily, plenty of options are available for accessible bathrooms that look beautiful and provide the functionality a wheelchair user needs.

Regarding ADA-compliant bathroom counters, it is recommended that the top rim of the sink be no more than 34 inches from the floor. This height allows the sink to be easily accessed by someone in a wheelchair and still be able to use the faucet, wall switch, and wall outlets. Additionally, the countertop should be no more than 21 inches deep. This is 3 inches shallower than a typical countertop and helps avoid accidental spills for some people with limited mobility.

For an ADA-compliant vanity, it is recommended that the mirror be no higher than 40” from the floor. This ensures that seated users can see themselves well and gives enough space for a grab bar to be installed. For a more finished appearance, corbels can be added to the sides of the vanity. These can be found in Home Designer Core Catalogs> Architectural> Millwork> Ogee Corbel and placed in your plan by clicking in the drawing area and using the Open Object edit tool to display the Millwork Specification dialog.

The goal of a handicap-accessible bathroom is to make the room safe and convenient for anyone who needs it, regardless of their ability level or mobility. With a little planning, it’s easy to create an accessible bathroom that everyone who uses it can use comfortably and safely.

Bathroom accidents are among the most common causes of home injuries, especially for people with limited mobility. Safe and convenient bathroom features such as grab bars, non-slip flooring, and walk-in tubs can reduce these risks by making it easier for individuals to navigate their space without assistance.

Handicap-accessible remodeling can also make it easier to stay in your home as you age, eliminating the need to move into a nursing or assisted living facility. Planning your remodel with aging-in-place principles in mind allows you to enjoy your safe and functional bathroom for years.

When designing your handicap bathroom, it is important to provide adequate floor space for wheelchair maneuvering. We can widen your doorways so that a wheelchair can easily pass through, and we can install lever handles instead of traditional doorknobs to ease operation. In addition, we can install cabinets and shelves at a lower height so that they are easier to reach from a seated position. This can eliminate the need to bend down or overreach, which can lead to back strain and injury.

We can also install a low-profile toilet raised off the ground to make getting on and off easier. In addition, we can add safety grab bars to the shower stall and bathtub to provide additional support. We can even install a hand-held showerhead to reduce the need to reach and grasp the faucet, which can become challenging for people with limited mobility. These simple but effective modifications will help you stay safer and more comfortable in your home for longer, and they can also increase the resale value of your property.

Bathroom mishaps are one of the most common reasons for hospital visits, and they are often caused by tripping over objects that are left out or in the way. An accessible bathroom can help prevent injuries by making it easy for people with disabilities to navigate the space. Our team of remodeling professionals will work to make your new bathroom safe and comfortable without sacrificing style.

In a bathroom remodel, we can install showers with seats and grab bars that allow people to move around more easily, as well as lowered sinks and toilets. Wider doorways and slip-resistant flooring can also be included in the renovation to increase safety. These improvements can help people with limited mobility stay in their homes for as long as possible and maintain a sense of independence and comfort.

Accessible remodeling can include various options, including lowering light switches and installing lever handles instead of knobs requiring pinching. We can even add a dimmer switch to adjust the brightness of the lights based on individual needs.

Another important aspect of an accessible bathroom is a raised toilet that is easy to get on and off. This simple modification makes it easier for individuals with limited mobility to use the restroom and can also reduce back pain from squatting.

A handicap-accessible bathroom can improve the comfort of a home and reduce the need for expensive hospital stays and caregiving services. It is important to have a professional handle the remodeling project to ensure that all of the necessary features are in place. When you are ready to make your home more accessible, contact Metropolitan Bath & Tile. We can discuss your goals and budget to find the right solutions.

The First Steps of the Kitchen Counter Installation Process

kitchen counter installation process

The first step of the kitchen counter installation process is preparing the area to receive the new surface. In this article we’ll cover the preparation steps for quartz or granite countertops. We’ll also discuss the installation process itself. Before you begin, make sure you have the correct tools and materials. We’ll show you how to properly position the counter and how to fit miter bolts. Once you’ve completed these steps, you’re ready to install the new surface. Go to https://thompsonandboys.com/ for more details.

Preparation

Before your kitchen counter installation can begin, remove all of the items from the area. Remove appliances that you do not use on a daily basis, as well as tables, rugs, and any other objects that may be in the way. Make sure that your home has enough air flow, and open windows. Make sure that your floors are clear of dust and debris, and ask your contractor about clean-up procedures before the work begins.

If you are installing an epoxy counter, call a plumber to disconnect any existing plumbing. If you do not, you could end up generating fumes during the installation process. During this visit, you can finalize the details with the templater. Once the countertops are installed, the templater will return to measure the walls. You should expect some noise during this time, so you should plan your cooking around the contractor. If you have a portable island or dining table, move it out of the way for the installers.

Before the countertop installers arrive, remove all kitchen appliances, plants, breakables, and decorations from the area. The contractor will need easy access to the kitchen so make sure to remove these items from the room. Also, be sure to remove anything else that may hinder their work. If possible, arrange a temporary workspace in another room. You can then move the countertop installation onto the new counter. It will be much easier for the installers to move the countertop if you are home during the process.

If you choose a quartz countertop, ensure that the area is level, as quartz does not fit perfectly with cabinets. In areas without cabinets, it may be necessary to install support pieces. If you have a faucet, it may be necessary to remove it so that they can access the countertop. This can save you money, but make sure that you turn off the water before the installation begins. If you do not, it might cause damage to the countertop and surrounding cabinets.

Preparation for countertop installation

Before installing your new kitchen countertop, you will need to prepare your home. To start, you should disconnect the plumbing in the area. After this, you will need to clean up any debris. If possible, you should also remove any tables or appliances from the area. If the project requires moving a table or portable island, be sure to do this first. Also, you should move any items outside so that the countertop installation team can access those areas.

The next step is to protect your floors. The flooring should be clean and clear of debris and any rugs. You should also move any objects that may get in the way during the installation. For example, you might want to remove a table in the entryway with a vase that might break. Another consideration is noise. Make sure to plan your new kitchen countertop installation according to the sound you’d like to hear. Make sure that all surfaces around the new kitchen countertop are level.

The next step in preparing your kitchen for a new countertop is to plan the layout and materials. The layout and materials you’ll need will also depend on the material you choose. For example, a marble countertop might generate fumes, so you’ll need to plan the layout and base cabinets first. You’ll also need to make sure that the windows are open and that you have ample space for the countertop.

Finally, you’ll need to remove the old countertop, if applicable. This process will require several hours. Make sure the area is cleared out enough to accommodate the installer. You may also need to remove the old countertop and place it somewhere out of the way for several hours. You’ll also need to remove any other appliances that might be in the way of the installation. Make sure to keep pets out of the area for the duration of the process. Whether you’re remodeling your entire kitchen or just need a new countertop, you’ll need to prepare the room accordingly.

Preparing for granite countertop installation

Granite countertops are heavy and tricky to transport. It is best to have someone help you with the installation. You must also leave the area clear of all furniture and other materials. It takes anywhere from two to six hours to install a granite countertop in a kitchen. You can help the contractor by avoiding bringing your pets or small children to the installation site. You should also remove any cabinets from the area under the countertops and empty their top drawers.

Make sure to get accurate measurements of your cabinetry, especially the base cabinets. Measure along the entire length of the wall. The fabricator should also check for any obstacles in the kitchen. During the installation, you will need to cut the slab to fit the template. Once you have the measurements, you are ready to hire the fabricator. Ensure that your granite countertop fits perfectly into the kitchen. However, you may need to do some modifications to make it look good.

Make sure that you have an exact date for the installation. A granite countertop installation cannot begin without the installation of the sink and appliances. Without these, the contractor may not know where to cut or how much to remove. Therefore, you should do some preparation beforehand. If you have a sink in the kitchen, you may want to consider hiring a contractor to install it. Make sure that the granite countertop is installed by the same contractor so that the installation process won’t be delayed.

Granite countertops are heavy and can be difficult to install. Before hiring a contractor, make sure you clear a path from the front door to the kitchen. Because granite is heavy, the installer will need access to the space. If they cannot get inside, they can’t install the countertop. You can also prepare your cabinetry for granite by using three-quarter-inch plywood. Be sure to align the edges of the plywood with the edge of the cabinet to ensure that they don’t overhang the countertop. If you can, drill holes for the screws to prevent your cabinet from cracking.

Preparing for quartz countertop installation

If you’re ready to install a new quartz countertop in your kitchen, you need to prepare the cabinet first. While most quartz countertops can be custom-made, you may find that a slab is already installed. This means that you’ll have to cut around the existing slab and prepare the area accordingly. Make sure to take the necessary measurements and clear the area to ensure that the quartz countertop can be installed properly. Remember that quartz is heavy, so you should have a professional do the installation. Doing it yourself may save some money, but it’s best to ask someone with experience and expertise.

Once you’ve selected the design and color of your new kitchen countertops, you’ll need to prepare the cabinet space. Make sure that you’ve roughed in all electrical and plumbing systems. Ensure that all walls are dry and painted. Also make sure the flooring is finished. It’s helpful to have all of your appliances installed in the space before you begin work. Having your appliances in place and ready to go can save you time during installation.

While your new countertops will look beautiful and be a great addition to your kitchen, you should remove any countertops that you may already have. This way, you’ll get the look you want while maintaining the same level of functionality. You should also clear the area of appliances and floor-level cabinets to allow for the installation. Also, make sure that you’ve removed all breakable items from around the installation area. Make sure that everything is out of the way so that the countertop installation team can enter the space without causing any disruptions.

Preparing for quartz countertop installation in kitchen involves removing any existing surfaces and leveling cabinet surfaces. To ensure a level surface, you can place wooden shims between the countertops and the cabinets. Then, make sure to paint or seal the cabinets before installing the quartz. Make sure to allow sufficient time for the countertop to “set” before you remove the tape. So, start preparing for the installation!

Preparing for laminate countertop installation

To install a laminate countertop in a kitchen, it is essential to prepare the surface well beforehand. Depending on the type of countertop you are installing, you may have to make some changes. For example, you may need to install a wood riser to separate the countertop from its base. Using the riser, you can separate the laminate from its base, and then apply contact cement to the surfaces. Then, use a J-roller to apply the cement firmly. Be sure to avoid rolling the laminate over the edge as this could snap the laminate.

If you are installing a U or L-shaped countertop, you must cut the precut miters to fit together. Be sure to use a sealant on the precut miters. Apply the sealant to each miter and tighten it securely. This will help the countertop adhere to the wall properly. If you are installing a single sheet, you need to use two pieces of wood to form the L-shape.

Before installing the laminate countertop, you should prepare the area by clearing the area and removing the old countertops. Make sure to wear safety goggles and wear protective gear while adjusting the preformed laminate. Before starting the installation, you can use masking tape to protect the counter from chips and other debris. Measure the length of the countertop using a tape measure. You should also use a square leg and pencil to make a straight cut line.

If you are installing a Formica(r) brand laminate countertop in a kitchen, you need to prepare the wall for the laminate before you do anything else. Then, prepare the surface with contact cement. It will dry and fit snugly. You may have to clean the bearing of the handsaw if it dries. If you do not have a trimmer, you can use a handsaw.