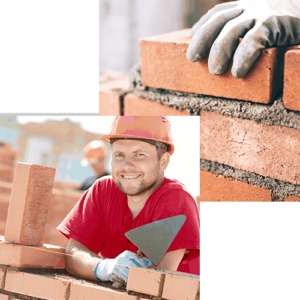
Driveway Pavers Long Island adds elegance to your home’s exterior. They are available in a range of colors and sizes. They are also durable.
Unlike gravel, pavers can withstand vehicle traffic without shifting or cracking. They are also safe for the environment as they allow rainwater to seep through and absorb into the ground.
Pavers add value and character to any property, from a charming paver patio to a driveway lined with bricks. They also tend to be easier to maintain than traditional asphalt or concrete surfaces. Effective paver maintenance techniques can make your investment last for years and even increase its resale value.
One of the most important steps in maintaining a paved surface is sanding it regularly. The sand helps prevent pavers from shifting and cracking, and it also keeps weeds from growing between them. The sand can be made from natural or synthetic materials, and it is available at most home improvement stores. You should use a polymeric sand that hardens when wet, as this will help it bond with the paving stones.
Another important step is to seal your paved surfaces every few years. This will protect the pavers from damage caused by freeze-thaw cycles, salt and other contaminants. It will also prevent the pavers from staining and will keep them looking clean. When applying the sealant, follow the instructions carefully to avoid damaging the paving stones.
In addition to sanding and sealing, you should sweep the paved surfaces regularly. This will remove loose dirt and debris, including leaves. It is also a good idea to rake the surrounding landscaping regularly and apply weed killer as needed. In the spring, you can spray down your paving stones with a hose attachment to remove any excess dirt and grime that may have built up over the winter.
Pavers can withstand a lot of vehicular traffic, and they are a reliable choice for a driveway or walkway. In fact, they are up to four times stronger than poured concrete, so you don’t have to worry about the pressure of cars and trucks damaging your pavers. They are also highly customizable, with a variety of sizes and colors to choose from.
If you need to replace a damaged paver, it is a simple process that can be done in a few hours. You will need your replacement stone, filler sand and a few other tools to install it. In contrast, fixing a crack in an asphalt or poured concrete driveway requires heavy equipment and a lot of work.
Versatile
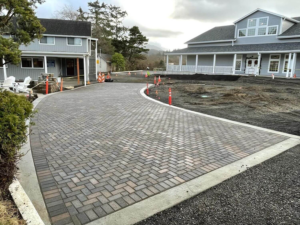
Driveway pavers are a great choice for homeowners looking to add style and sophistication to their property. They are available in a wide variety of colors and styles, and they can be easily mixed and matched to create unique patterns that complement the overall layout and design of your home’s exterior. You can also use these stylish pavers for other hardscape projects, such as patios and walkways.
Pavers are designed to withstand heavy loads and a range of weather conditions, including freezing temperatures and rains. Their interlocking design and gaps between the stones allow for water drainage, reducing surface water buildup and preventing freeze-thaw damage. They are also resistant to cracking, making them a long-term investment for your driveway.
Choosing the right color and style of pavers will determine the overall look of your driveway. You can choose from a wide range of colors, from neutral shades to vibrant hues. The material can also be textured or smooth, depending on your preference. If you are interested in a particular color, it is important to find an authorized supplier that sells this product locally. This way, you can be sure that you are getting the authentic product instead of a knockoff.
Another benefit of pavers is that they are highly customizable and can fit any driveway size and shape. They can be installed in a grid pattern or in an asymmetrical arrangement. They can also be cut to accommodate curves and angles. This allows you to achieve a cohesive look that enhances curb appeal and increases your home’s value.
In addition, pavers are easy to maintain. You can wash them with a mild soap and garden hose to keep them clean. They are also stain-resistant and repel oils and other fluids, resulting in less maintenance. Additionally, you can install permeable pavers for a more environmentally-friendly option. These allow for the natural flow of rainwater, reducing surface runoff and preventing car fluids from draining into sewer systems. This is especially helpful in areas prone to flooding and erosion. Moreover, this type of driveway is safe for pedestrians and cars, as it offers excellent traction in wet or icy conditions.
Durable
Pavers are a durable surface for driveways and entryways. They are able to withstand heavier traffic than gravel and stand up to weather elements better than concrete slabs. This is because pavers are designed with smaller blocks with space in between them that allows for expansion and contraction without interfering with the paver as a whole. This helps prevent cracking, sinking and shifting as vehicles drive over it. If a driveway made with pavers does crack, sink or shift, it is usually due to poor installation or choosing the wrong type of paver for the job.
There are many different types of pavers, each with their own distinct aesthetic and durability traits. Some options include granite, a high-end option known for its strength, as well as limestone and slate, which are available in a variety of finishes. There are also concrete pavers, which offer a balance between affordability and durability. Additionally, there are composite pavers, which are made from recycled materials for a sustainable option.
In addition to their durability, paving stones provide an attractive appearance that complements the style of many homes. They are available in a wide range of colors and styles, from traditional to contemporary. The varying textures and color combinations of pavers give them a unique look that can add depth and character to any outdoor space.
As with most surfaces, driveways are subject to daily wear and tear. Inclement weather conditions like rain and snow, freeze-thaw cycles, weed growth and chemicals used for de-icing can all contribute to the deterioration of a surface. Driveway pavers can withstand these forces better than other paving options, including poured concrete and asphalt.
While the initial upfront cost of pavers may be higher than other paving options, they offer an exceptional long-term return on investment. This is because they do not require any resurfacing or replacement like concrete slabs do. Furthermore, in the unlikely event that a paved surface with pavers becomes damaged, it is easy to repair by removing the affected piece and replacing it with a new one without disrupting the entire layout.
Affordable
When homeowners are choosing a new driveway material, they want something that looks good but also lasts. Traditional materials like poured concrete and asphalt can be very expensive and difficult to repair if damaged. Driveway pavers offer a durable, affordable alternative. Unlike other options, such as gravel and paved stones, paving bricks are not loose and easily scattered by vehicles. They are also non-slip and have a more consistent surface that prevents skidding. Plus, pavers have a more attractive appearance than concrete and gravel, making them ideal for your front yard.
Compared to traditional paved surfaces, pavers are four times stronger. This means they are capable of withstanding a lot of weight without cracking or shifting. For a driveway, this is particularly important since vehicles can weigh a lot more than foot traffic. Additionally, the type of paver you choose will impact how well your driveway withstands weathering and erosion.
Pavers are also a cost-effective option when it comes to maintenance and upkeep. While they might be more expensive upfront than a gravel driveway, they can save you money down the road in terms of resealing costs and time spent shoveling. Furthermore, a stone paver driveway can be designed with a heating system underneath it to melt snow and ice. This means you can eliminate the need for salt and chemical de-icers, which is good for the environment as well as your wallet.
While cobblestones are among the most durable paving options, they can be costly. To offset this, many people opt for a permeable paving solution, which is an eco-friendly way to reduce the amount of rainwater that drains into sewer systems. By utilizing spacer bars and wider gaps between the stones, permeable pavers allow water to seep into the soil beneath, rather than pooling on the surface of the driveway. This helps mitigate the risk of puddling, and it allows for grass to grow between each paver, further reducing maintenance costs by eliminating the need for trimming and weeding.
Unilock offers a number of options for paver driveways, including permeable pavers. These paving stones are crafted with drainage in mind and have the same aesthetic as traditional pavers but are designed with a lower carbon footprint. This is due to the fact that they are made with recycled content and far exceed industry standards set by ASTM, CSA and European organizations. Additionally, they feature a wide color palette and are available with textured surface lines to create a more appealing and unique look.